

A broken chain can ruin your whole day.
Your best outcome to breaking the drive chain on your dirt bike is, well, a broken chain. The worst? How about a damaged crankcase. Or how about the chain whipping you in the back as you blaze down the motocross track? To say it hurts would be an understatement.
This happens when the chain is either too loose or too tight. Additionally, a loose chain wears out the rubber on your swing arm and can derail. If it's too tight it can wear out your sprockets prematurely.
But you can prevent all that.
Ever notice how the chain tightens when the rear shock is compressed? That's why it is important to check your chain often to make sure it is within manufacture specs. Checking your chain's slack is a must before every ride and it's actually very easy and takes but a few minutes.
If the chain has too much slack you'll certainly hear it when you're riding, and you will definitely be able to notice that the chain is loose just by giving it a quick visual inspection. If the chain hangs like an old clothesline you better get it tightened. Conversely, if the chain barely gives when you press down on it then it needs some slack.
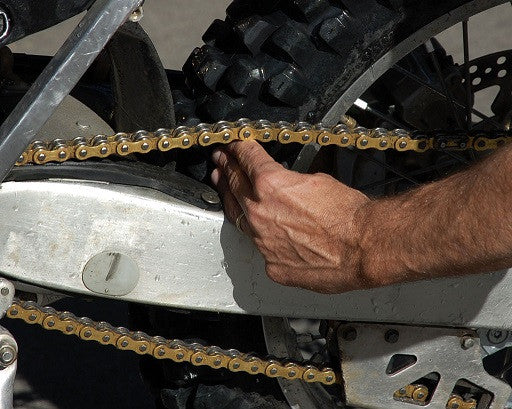
Beyond the visual check is the finger check. Use the three finger method before every ride. Place three fingers, on top of each other, behind your chain slider. Allow the chain to drape across the top of your index finger to check the chain adjustment. The chain should be taut against your fingers. If it's loose or too tight you need to adjust your chain.
Use three-finger method to check chain length
If the chain is tightened properly, you're good to go after going over your other pre riding maintenance tips.
But if you determine the chain is either to tight or too loose you need to adjust the slack before you start riding. So how do you do that?
We're glad you asked.
If you're new to dirt biking, fear not! There's no need to remove the chain, remove links, put the chain back on and see if you've got it right. Heck, that would take all of your riding time!
The first step, which sets the chain length, is checking the alignment of the chain blocks. The chain blocks sit in the swingarm which houses the wheel axle. Adjusting the chain from this point requires you to loosen your rear axle nut. You can then modify the chain adjusters by loosening the locking nut (that butts up against the swingarm). Make sure you use the proper size wrench here so you do not strip the chain adjusting bolt and nut.

To check the wheel and axle alignment, notice the marks on the swingarm. Use a micrometer or the notches on the swingarm to see how far back the chain is pulled on the left and right sides. If for example, the chain is pulled back four lines on the left and five lines on the right, the wheel and axle are crooked. Aligning the wheel and axle may be all that's required to tighten or loosen the chain.
After fixing the alignment (if needed) and adjusting your chain blocks use the three finger rule again and see how the chain rests across your fingers. If you determine the chain still requires adjustment then go back to the chain blocks. Notice the bolt protruding from the swingarm. Tighten this bolt to loosen the chain, loosen the bolt to tighten the chain.

This bolt essentially pushes on the chain block which the axle runs through, thus tightening or loosening your chain.
TIP: When checking the chain tension make sure the chain blocks butt up against the swingarm adjuster bolts. This ensures you get the truest reading when checking the tension on your chain. In fact when you go to tighten your axle, it's a good idea to take a shop rag, fold it up and place it on the rear sprocket, all while spinning the wheel backwards. The rag will jam in the sprocket and chain, causing the wheel to stop, tightening your chain, and butting those chain blocks up against the adjuster bolts. This is when you will tighten the rear axle nut to your manufactures ft. lb. spec.
Once you've tightened the rear axle nut do the three-finger check. Check your chain blocks and make sure they're aligned properly and not crooked after tightening the axle as well.
When performing chain adjustment it's always a good idea to check not only the condition of the chain but the sprockets too. If you see any wear or missing teeth then it's time to replace the entire chain drive. We never recommend replacing one or the other. Always replace both the chain and sprockets together to prevent premature wear.
Once you're done tightening the chain and ensuring the axle nut and the chain adjust bolt and nut is snugged up, go ahead and lube up your chain so you're ready next time you ride.
Now, get out and ride!